
 It’s fun to create your own background papers for your layouts. You can use them as the whole background or crop them and use them for journaling boxes, or even matting a photo.
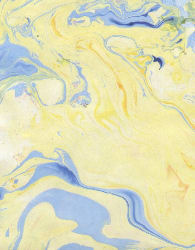
Creating marbled paper is actually really easy. I’ve found a couple of different ways to do it, so I will share both of them.
Marbled Paper #1
Here is what you need:
White glossy cardstock
Metallic ink refills
Water-based ink refills
Denatured (rubbing) alcohol
Cotton balls
Heat tool
Spray sealer
Here is how to create the marbled paper – Begin by applying small drops of the metallic ink (from a refill bottle) onto a sheet of glossy cardstock.
Next, dip a cotton ball into the alcohol, and squeeze most of the liquid out of the cotton ball. Apply small drops of water-based ink onto the wet cotton ball.
Then, dab the cotton ball up and down all over the cardstock; the inks will blend, creating a marbled appearance.
Swirl the ink to blend the colors and to spread the metallic ink into “veins”. Let the cardstock dry.
When you are ready to set the ink, you will need to dry the cardstock with a heat tool for about 25-30 seconds. You may also use embossing ink and powder.
Be sure and spray with a sealer to protect your finished artwork.
 Marbled Paper #2
Here is what you need:
Shaving cream
Paper plate or cookie sheet
Re-inkers
Straw
Cardstock
Here is how you create the marbled paper:
First, spread the shaving cream ½” to 1″ thick on a paper plate. If you want larger sizes (for 12×12 papers) use a cookie sheet.
Drop the desired colors of ink from your re-inkers onto the shaving cream. If you use more ink, the design will be darker on your paper.
Take your straw and swirl the drops of ink in a circular motion throughout the shaving cream. The more you swirl, the finger the swirls of color will be on your finished paper.
Next, take a piece of cardstock and place it directly on the shaving cream and push down to cover ever inch of the surface of paper.
Starting with one corner peel the paper off the cream and place it face-up on paper towels.
Set aside and allow the paper to dry completely.
You can then swirl the cream all over again and you should be able to create at least four or five sheets of background paper.
Have fun and get creative!