A few weeks ago I posted an article about a software program called, Picture Resizer. I suggested using the program to resize and compress your digital photos before emailing them off. You can read the article here.
I wanted to pass on another easy way to resize and/or compress pictures for emailing or posting on your family website. You can use Microsoft Picture Manager 2006 which is included in any version of Microsoft Office 2003. Unfortunately, not everyone uses or has access to Office 2003, but there are enough users that I want to pass on the information.
Photo Manager replaces Photo Editor
Microsoft Picture Manager replaces Microsoft Photo Editor, which used to come with Microsoft Office (before the 2003 edition). Picture Manager is not a photo editor by any means, but it can perform a couple of quick actions that we’ll discuss here.
Where is Photo Manager located on my computer?
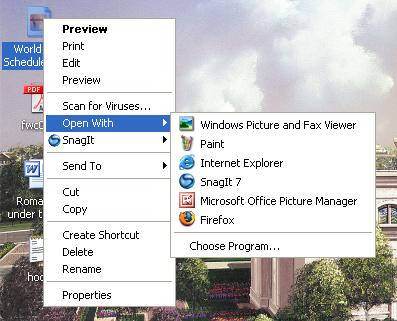
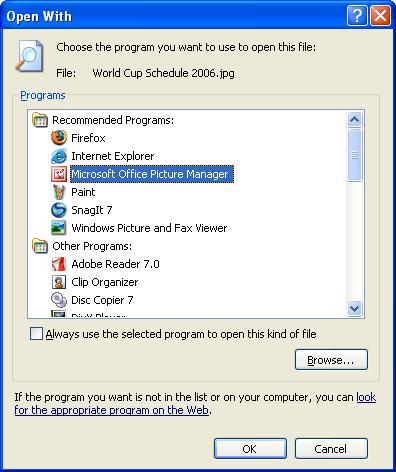
Picture Manager is installed by default into the Microsoft Office Tools program menu that can be accessed from your Window’s start bar. Opening Picture Manager in this way will display any pictures you have in your “My Pictures” (located in the “My Documents” folder). You can also quickly access Picture Manager by right clicking the mouse on a picture file and selecting the option, “Open with…” and selecting the program (see 1st picture below). If Picture Manager isn’t listed, you may have to select “Choose Program…” and select it from the subsequent window (see 2nd picture below). For some, Picture Manager may still not be listed in the Open With menu, so you’ll have to browse for it. I won’t go into details here about how to do that, but if you need help doing so, please click on the comment button at the end of this blog, drop me a comment, and I’ll reply with a quick how-to article.
Compressing photos:
Compressing photos reduces the file size, but also reduces the image quality some. You can take a large size photo file and compress the photo down to a file size small enough to email without overloading your friends’ email In-box.
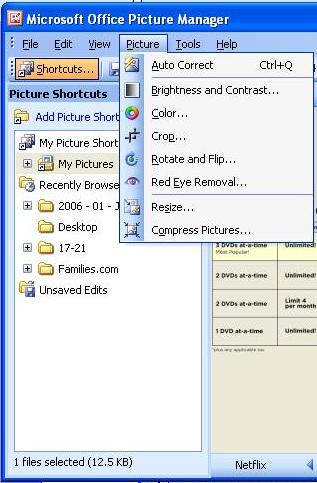
You can access the “compress pictures” option in Photo Manager one of two ways. The first way is to select “Picture” from the menu bar at the top of the program window. The last option in the menu is “Compress Pictures… .” I have posted a screenshot of the menu bar below.
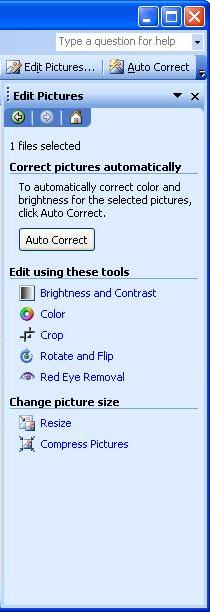
The other way to access the compress pictures option is to click on the “Edit Pictures…” option from the tool bar near the top of the program menu. A task menu will open on the right side of the screen with “Compress Pictures” again as the last option (see picture below).
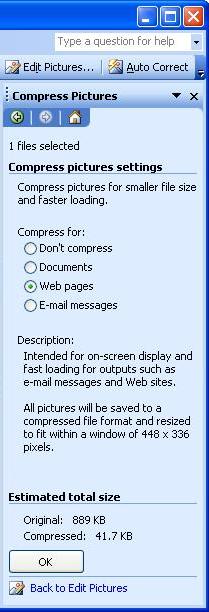
After selecting “Compress Pictures” from either menu, the Compress Pictures task menu will appear. You have four compression options to choose from, including choosing not to compress. In the screenshot below, notice I have a picture with a file size larger than I should email. I selected the “web pages” option and the estimated file size becomes 41.7 KB. When I went ahead and compressed the picture, the actual file size was 43 KB. I recommend using “Web pages” for pictures you want to email or post on the web. You can use the “E-mail messages” option, but the picture size sometimes becomes too small for my tastes. After selecting your compression choice, make sure to click the “OK” button at the bottom of the task menu. You then must save the newly compressed picture, sparing your original picture from being changed.” If you forget to save the new picture, Picture Manager will prompt you when you try to close the program or work on another picture. Be careful, however, that you don’t save over your original picture.
Resizing Photos
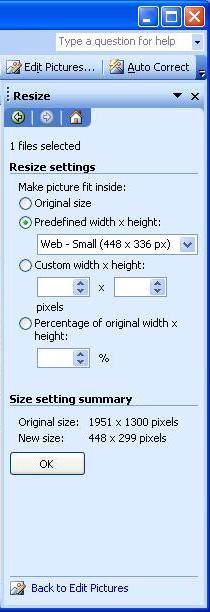
The option for resizing pictures is located in the same place as the option for compressing pictures (see text and screenshots above). Just select “Resize” and the Resize task menu will open. You can choose from three different resizing options. The easiest is the “predefined width x height” option. Within the predefined selection are six different options for you to choose from. A lot of the pictures I use in my blogs are resized with the “Web – Small” option, as noted in the screenshot below. You can see the original and new picture sizes as the bottom of the task menu. After selecting your option, remember to click, “OK” and save the newly sized picture. You will find that the new picture usually has a small enough file size to email.