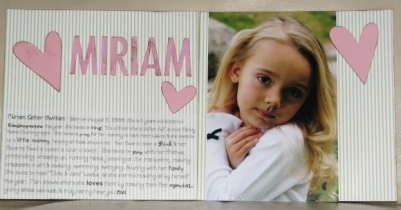
Miriam is my oldest and this layout really describes her well. She is very elegant, simple and gorgeous. I chose a green pin-stripe pattern for the base of her layout. I knew that her very favorite color is pink so I chose to accent her page with pink and only pink.
Part of what makes Miriam’s layout so beautiful is the simplicity of it. I used three chipboard hearts from Heidi Swapp’s new line, which I totally love! I distressed the hearts using Ranger’s Distressing Ink. Distressing has quickly becoming one of my favorite techniques to use in my scrapbooking because it isn’t an exact art and a little goes a long way. I, also, distressed the edges of the pages.

I cut out her name using the Quickutz Squeeze handle and Studio Classic alphabet dies. I used all upper case to give this page a clean feeling. Because I needed seven copies of her name, I cut each letter seven times. I used a 12×12 sheet of Bazzill Basics Romance pink textured cardstock for the letters. I cut as many letters as I could out of one side of the cardstock, then I used my paper trimmer to cut off the negative impression so I could cut another row of letters. This is a great way to get as many letters as possible out of each piece of paper and it gives you usable scraps to play with afterwards. I grouped the letters into the seven names and put each letter through the 2” Xyron machine to make it like a sticker. Then I distressed each letter so it coordinated with the other elements on the page.
I attached glue dots to the back of the chipboard hearts and placed the first one to the name/journaling page to give me a starting point for her name. Next I positioned her name by putting each letter with the amount of spacing I wanted on my clear acrylic ruler. Then I laid down the ruler where I wanted her name to go and attached the stickers, perfectly aligned. I placed the other heart below her name and attached her journaling.

For the picture page, I attached her picture (she posed herself and enjoyed every second in front of the camera) using Hermafix. For the final touch, I placed the last heart slightly overlapping the top right of the photo. I was really pleased with the final results of this layout! Enjoy!