
I recently did a tie-dying activity with some twelve and thirteen year old girls and they had a blast. The project was simple enough that younger children could also create their own tie-dyed t-shirt with a little help from mom or dad.
You will need:
A white t-shirt
Rit dye
Water
Rubber bands
Plastic gloves
Metal Bowls (plastic with get dyed) and plastic cup
OR
Spray bottles or Squeeze bottles
Directions:
1. Start by creating the design that you want on your t-shirt.
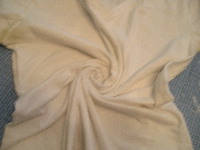
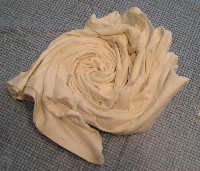
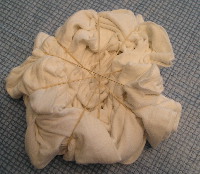
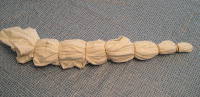
When making a large spiral design you grab the middle of the shirt and start twisting it too the right, until the entire t-shirt is in a large cinnamon roll shape (see pictures below). Then you put rubber bands around the shirt, in all directions, so that it holds the shape.
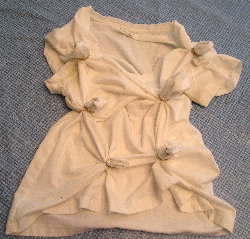
For random small circles choose a small area of the t-shirt, pull it out from the shirt, and place a rubber band around the base of the area. Make sure that the rubber band is very tight and there are no spaces in between the layers of rubber. Then continue pulling out different areas of the t-shirt both front and back.
To make concentric circles grab the t-shirt where you want the center to be and pull until you’ve made a long tube. Then put rubber bands every few inches along the shirt.
2. Once you have your design ready it is time to prepare the coloring. If you bought Rit dye follow the instructions on the back of the box to mix the dye with water. You can mix the basic colors to make orange (yellow and red) or purple (blue and red). You will need a different bowl for each color. The Rit dye box says you can only do 3 shirts with one box. But that is when you are dying the entire shirt one color with tie-dying it takes less dye. You can also dilute the dye if you want a lighter, more pastel color.
3. There are two different ways to apply the color. You can use one color or multiple colors. It is best to wear plastic gloves to prevent your hands from getting dyed.
Put the colored water in a spray bottle (make sure it is on a stream not mist setting) or squeeze bottle and spray or squeeze onto the material. Make sure that the shirt is completely saturated with water.
Use a cup and pour small amounts of the colored water onto the shirt until it is wet but not dripping.
4. Once your color has been applied wring out the t-shirt as best as you can. Then remove the elastic bands. Set the t-shirt out to dry in the sun. Then follow the instructions on the package of Rit dye to set the color. The first few times you wash the shirt you will need to wash it by itself, just in case any of the color bleeds out.
Note: The dye is permanent so it is best to tie-dye outside and wear old clothes.