
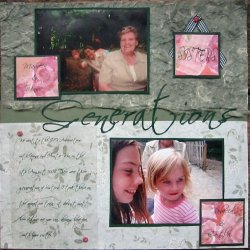
As a scrapbooker, you are probably always on the lookout for a simple technique that can really add depth to your pages and a splash of color. A fun technique to use on your layouts are creating Serendipity Squares.
What are Serendipity Squares?
Creating Serendipity Squares is an easy technique that adds a certain flare, a splash of some color and a collage effect to your pages with not a lot of work. They are very simple to make and can help you use up a lot of those scraps and leftover supplies. And the best part? There is no wrong way to make them.
First, gather a selection of scrap materials:
- scraps of colored paper
- left over stickers
- skeleton leaves
- glitter ribbons
- mesh
- mulberry paper
- rub ons
- foil
- stamped images
Really, whatever you can find to use.
With a serendipity square, the possibilities are endless and go only as far as your creativity can go!
Once you have gathered up all your supplies, it’s time to get started and this is actually the really fun part! I recommend using a piece of cardstock in a color that coordinates with your layout. It does not need to be a full piece of cardstock, but needs to be large enough that you can create several perfect squares out of it.
Place the cardstock on a flat surface and begin just gluing things on the cardstock in a very collage-like fashion. Strips of torn colored cardstock, torn patterned paper, ribbons, stickers, and whatever else you find that looks good.
Overlap the items. And be sure that you leave a little color showing through (not much though) of the original cardstock. You can use just about anything on these little squares too!
After you have completely adhered all that you’d like to add to your collage, allow it to dry.
Once the collage is dry, it’s time to figure out the size you’d like for squares.
The standard serendipity square size seems to be about 2” however, you can make them as large or as small as you’d like. Using a paper punch is the quickest way to create your squares, but a paper cutter works just fine too. Just trim in strips and then cut them into squares. Now that you have your squares you have another option. I like to mat my squares. I place another piece of cardstock behind the squares and trim leaving just a touch of a coordinating color showing.
Adhering these little squares to your layouts is just like adhering any embellishment. You can use any type of adhesive that works well on paper.
 |
|
contributed by Amber Harrop-Johnston |
 |
|
contributed by Amber Harrop-Johnston |